2019. 8. 11. 13:17ㆍProgramming/Kubernetes 입문반, Google Study Gem 정리
Managing Deployments Using Kubernetes Engine 퀘스트 정리
Quest Outline을 따라서 Managing Deployments Using Kubernetes Engine에 접속하면, 좌측 상단에 Start Lab버튼을 볼 수 있다.

좌측 상단에 위와 같은 Start Lab 버튼과, 1시간으로 설정된 타이머를 볼 수 있다.

Start Lab 버튼을 누르면 타이머가 동작하기 시작하며 Google Cloud Console에 접속할 수 있는 계정정보가 표시된다.(Username, Password로 구글 계정에 접속하면 된다.) 타이머가 0이 되거나 혹은 End Lab버튼을 누르게 되면 더 이상 Google Cloud Console에 해당 계정으로 접속할 수 없으니, 주의하도록 하자. 퀘스트를 진행하는데는 보통 타이머에 표시된 시간만큼 사용하게 되므로, 충분한 시간이 있는지 체크해두고 시작하도록 하자.

Google Cloud Console에 접속하게되면 계정을 선택할 수 있는데, Use another account를 선택한 뒤 아까 전에 표시된 Username과 Password를 입력하도록 하자.
이 퀘스트에서는 다음의 내용을 진행하게 된다.
- Practice with kubectl tool
- Create deployment yaml files
- Launch, update, and scale deployments
- Practice with updating deployments and deployment styles
이 퀘스트를 진행하기 위해서는 이하의 선행학습이 진행되어야 한다.
- Before taking this lab, you should have taken at least the labs Introduction to Docker and Hello Node Kubernetes
- Linux System Administration skills
- Dev Ops theory: concepts of continuous deployment
Google Cloud Console에 접속됐다면 Cloud Shell을 실행시키도록 하자. 리눅스를 사용한 적이 있다면, 익숙한 화면을 볼 수 있다.

Google Cloud Console의 터미널 버튼을 누르면...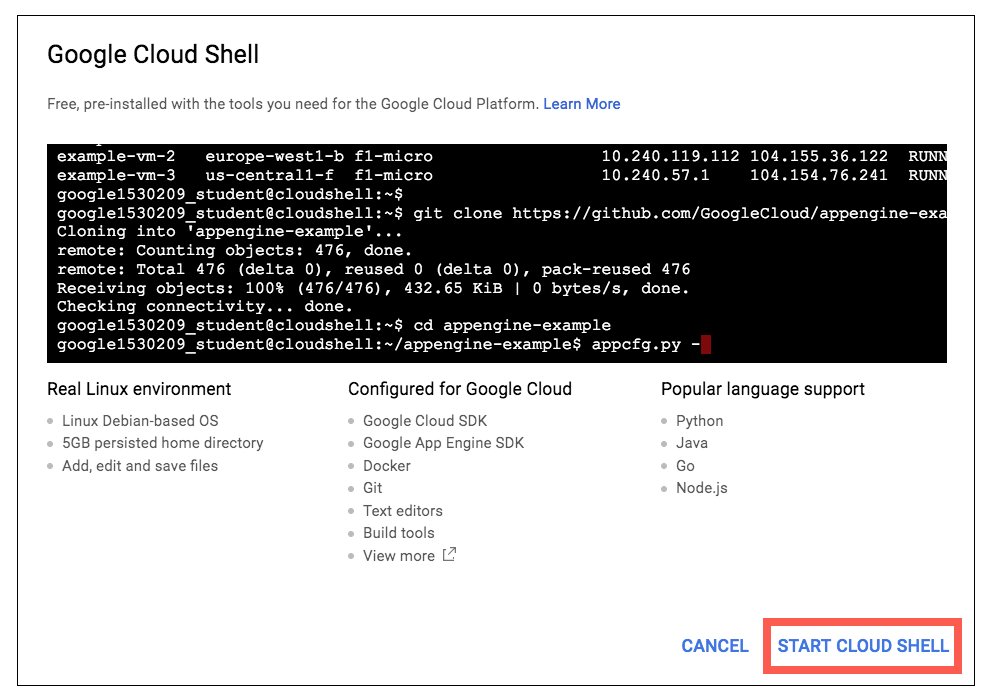
Google Cloud Shell에 대한 안내가 다이얼로그로 표시된다.Start Cloud Shell을 눌러서,Cloud Shell을 실행시키도록 하자.
다음과 같이 입력하여 project ID를 설정하도록 하자. project ID를 아무거나 입력하면 안되고, Start Lab을 눌렀을 때 나오는 GCP Project ID를 입력해야한다.
gcloud config set project <project_ID>
project ID가 제대로 설정되어있는지는 아래의 커맨드를 입력하여 확인할 수 있다.
gcloud config list projectManaging Deployments Using Kubernetes Engine
favorite_border
Add to favorites의 샘플 코드에서 확인할 수 있다. 퀘스트를 마치고 시간이 된다면 샘플 코드를 살펴보는 것도 좋을 듯 하다.
Cloud Shell에서 샘플 코드를 다운받은 뒤 아래와 같이 입력하여 클러스터를 생성한다. 클래스터 생성과 관련된 내용은 gcloud container clusters create, Google Cloud SDK 페이지를 참조하도록 하자.
gcloud container clusters create bootcamp --num-nodes 5 --scopes "https://www.googleapis.com/auth/projecthosting,storage-rw"
https://www.googleapis.com/auth/projecthosting,storage-rw 스코프에 nodes를 5개 갖고있는, bootcamp 라는 이름의 클러스터를 생성한다. 생성이 완료되기까지는 약간의 시간이 걸린다.
kubectl의 explain 커멘드를 사용하면 deployment 오브젝트의 내용을 확인할 수 있다. --recursive 옵션을 사용하면 모든 필드를 확인할 수 있고, deployment.metadata.name처럼 특정 필드만 지정하여 조회하는 것도 가능하다.
kubectl explain deployment
kubectl explain deployment --recursive
kubectl explain deployment.metadata.name
샘플 코드의 kubernetes/deployments 안의 내용을 확인하면 auth.yaml을 확인할 수 있다. vi편집기를 실행하여, image의 auth를 1.0.0으로 변경해주자.
apiVersion: extensions/v1beta1
kind: Deployment
metadata:
  name: auth
spec:
  replicas: 1
  template:
    metadata:
      labels:
        app: auth
        track: stable
    spec:
      containers:
        - name: auth
          image: "kelseyhightower/auth:1.0.0"
          ports:
            - name: http
              containerPort: 80
            - name: health
              containerPort: 81
...
auth.yaml 파일의 내용이 위와같이 변경됐으면, kubectrl create를 사용하여 deployment object를 생성하도록 하자.
kubectl create -f deployments/auth.yaml
Kubernetes는 deployment가 생성되면, 배포를 위해 ReplicaSet을 생성하게 된다. 아래의 명령어를 통해 ReplicaSet이 정상적으로 생성됐는지 확인할 수 있다.
kubectl get replicasets
퀘스트의 Create a deployment 내용을 쭉 따라서 진행하도록 하자. 결코 다 옮겨적기 귀찮아서 그런 것이 맞다. frontend Deplyment까지 생성이 끝났다면, 아래와 같이 curl을 이용해서 서비스가 정상 동작하는지 확인할 수 있다.
kubectl get services frontend
curl -ks https://<EXTERNAL-IP>
frontend service의 EXTERNAL-IP는 다음과 같이 입력함으로써 확인할 수 있다.
`kubectl get svc frontend -o=jsonpath="{.status.loadBalancer.ingress[0].ip}"`제대로 따라왔다면 curl -ks https://<EXTERNAL-IP>을 입력했을 때, 'hello'라는 응답을 받아오게 된다.
Deployment의 확장
deployment의 spec.replicas 필드를 업데이트함으로써, Deployment를 확장시킬 수 있다. 아래와 같이 explain 커멘드를 사용하여 replicas가 몇으로 할당되어있는지 확인하고, 이 값을 5로 설정해보자.
kubectl explain deployment.spec.replicas
kubectl scale deployment hello --replicas=5
Deployment가 업데이트되면 Kubernetes는 자동으로 ReplicaSet을 업데이트하고, 설정한 replicas 값만큼 Pods를 생성하게 된다. 아래와 같이 실행중인 hello Pods를 확인하여, 위에서 설정한대로 5개의 Pods가 실행중인지 확인할 수 있다.
kubectl get pods | grep hello- | wc -lRolling update
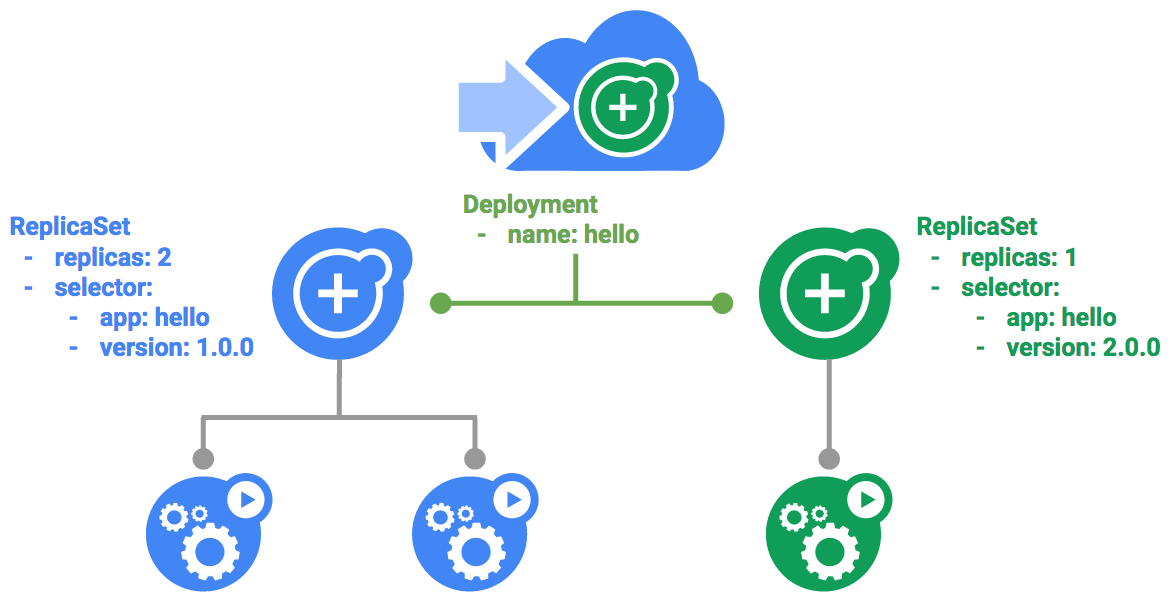
위와 같은 롤링 업데이트 메카니즘에 의해, Deployment는 새 버전을 업데이트하게 된다. Deployment가 새 버전으로 업데이트되면, 새로운 ReplicaSet을 생성하고 이전의 Replicas를 대체하게 된다.
아래와 같이 입력하여 hello deployment의 내용을 수정해보자. 자동으로 에디터가 실행된다.
kubectl edit deployment hello
에디터가 실행되면 아래와 같이 버전값을 변경한 후 저장하자.
...
containers:
- name: hello
  image: kelseyhightower/hello:2.0.0
...
변경된 내용을 저장하게 되면 클러스터의 Deployment가 업데이트되면서, Kubernetes가 롤링 업데이트를 시작하게 된다. Kubernetes가 생성한 새로운 ReplicaSet은 아래와 같이 커멘드를 입력하여 확인할 수 있다.
kubectl get replicaset
만약 롤링 업데이트를 멈추고싶다면, 다음과 같이 커멘드를 입력하면 된다.
kubectl rollout pause deployment/hello
현재 rollout의 상태는 다음과 같이 확인할 수 있다.
kubectl rollout status deployment/hello
kubectl get pods -o jsonpath --template='{range .items[*]}{.metadata.name}{"\t"}{"\t"}{.spec.containers[0].image}{"\n"}{end}'
만약 rollout을 다시 시작하려면, 다음과 같이 입력하면 된다.
kubectl rollout resume deployment/hello
rollout이 동작하기 전의 이전 버전으로 되돌리려면, 다음과 같이 입력하면 된다.
kubectl rollout undo deployment/helloCanary Deployment
이 항목에서는 현재 배포중인 서비스에, 새로운 서비스를 서브셋으로 배포하고자 할 때 사용하는 Canary deployments에 대해 설명하고 있다.
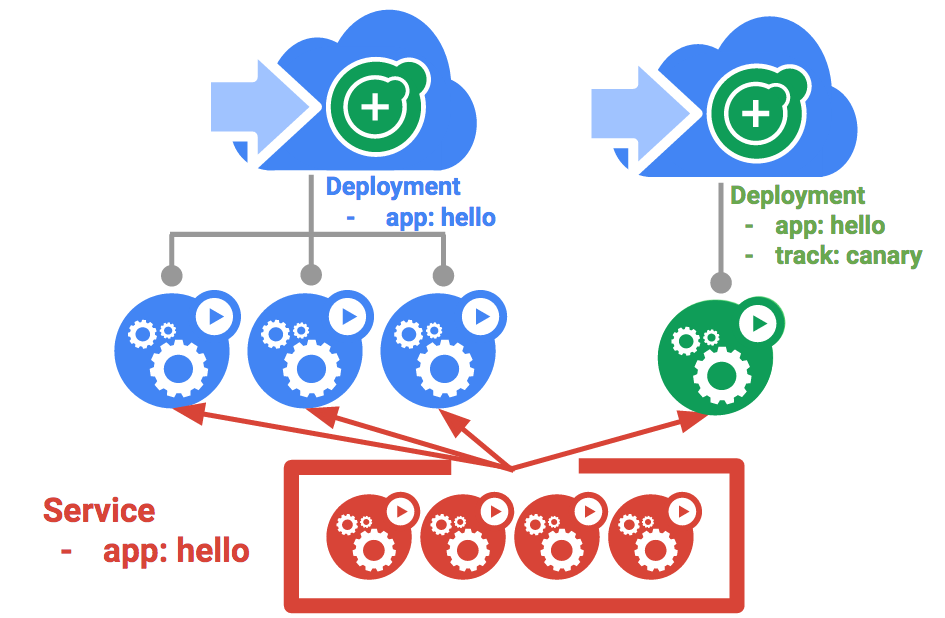
왼쪽에는 이미 hello 앱이 서비스중이고, 오른쪽에는 hello앱에 track항목으로 canary가 생겨난 것을 볼 수 있다. Canary Deployment가 바로 track에 해당하는, 서브셋 격인 서비스를 배포하는 기능을 말한다.
실습내용은 퀵랩에서 확인할 수 있는 내용이므로, 굳이 별도로 기재하지 않고 넘어가도록 하자.
Blue-green Deployment
롤링 업데이트를 사용할 경우, 완전히 배포되기까지 시간이 걸린다. 이럴 때는 Blue-green Deployment를 사용하게 된다.
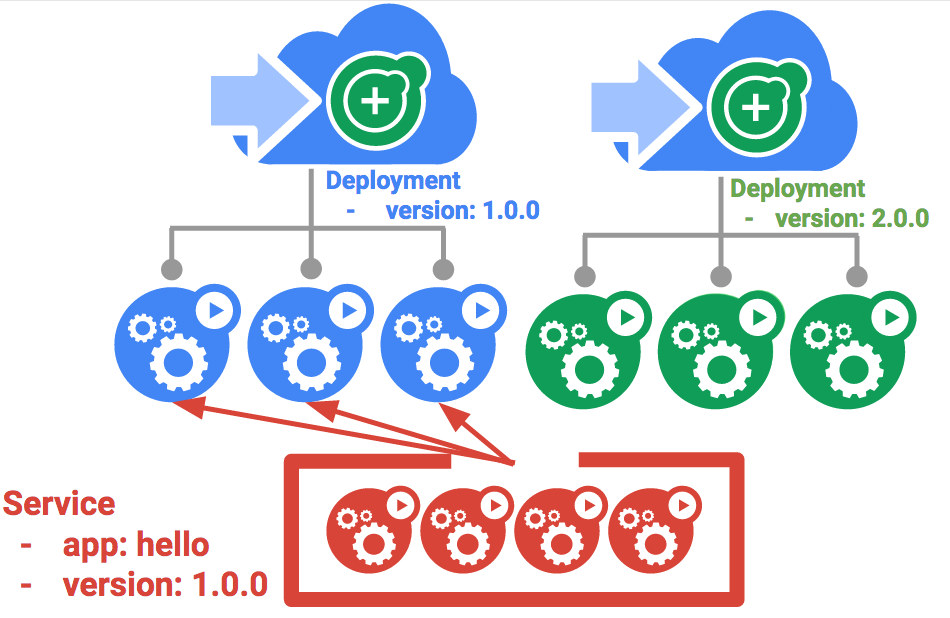
위 그림에서는 버전 1.0.0인 Blue버전의 hello 서비스와, 버전 2.0.0인 Green버전의 hello 서비스를 교체하는 것을 설명하고 있다.
# hello-blue 서비스를 적용한다. (1.0.0)
kubectl apply -f services/hello-blue.yaml
# hello-green 서비스를 생성한다. (2.0.0)
kubectl create -f deployments/hello-green.yaml
# hello-green 서비스를 적용한다. (2.0.0)
kubectl apply -f services/hello-green.yaml
# hello-blue 서비스를 적용한다. (롤백)
kubectl apply -f services/hello-blue.yaml
위와 같이 커맨드를 입력하여 Blue버전의 hello 서비스가 배포되고 있는 환경에서, Green버전의 hello 서비스로 교체를 진행할 수 있다.
curl -ks https://`kubectl get svc frontend -o=jsonpath="{.status.loadBalancer.ingress[0].ip}"`/version
apply 동작을 수행하기 전에 위와 같은 커맨드를 입력함으로써, Blue버전의 hello 서비스가 Green버전의 hello 서비스로 교체되는 것을 확인할 수 있다.
진행했던 내용을 처음으로 기록하다보니, 요약도 제대로 안되어있고 퀘스트 내용을 그대로 옮겨적은 듯한 느낌도 들어서 많이 고민했었다. 그나마 Canary Deployment, Blue-green Deployment쪽을 작성하면서, 퀘스트 본문의 내용을 옮겨적는 걸 최소화하면서 요약을 한 것 같아 좀 낫지 않았나싶다.
다음 퀘스트부터는 좀 더 잘 축약해서 정리하는 방법을 연구해와야겠다.